

Various training methods can be used to provide the catalyst to improve your results and performance. But, when it comes to improving performance it isn’t just about ‘doing some intervals’, or ‘going hard until you puke’. Training methods are intertwined with Training Zones.
As a runner, cyclist, even a triathlete, what’s important to understand is that training zones allow you to target specific physiological adaptions, which will inevitably produce more effective results from your training. You may have heard the terms sweet spot, anaerobic threshold, VO2 max and even FTP. But do you know what they all mean, and how they relate to your training?
Understanding your training zones can be complicated, but with the advancement of heart rate monitors, power meters, indoor smart trainers and certain training apps, utilising training zones is more accessible than ever. There are numerous training apps that will determine your training zones for you, meaning that it’s never been easier to add some structure to your training, whilst also allowing you to hone in on the precise area of your fitness and performance that you want to improve.
SO WHAT EXACTLY ARE TRAINING ZONES?
They are simply regions of intensity that relate to certain physiological processes that happen inside your body when you exercise. You can use training zones to target specific adaptions or intensities that you want to be able to work at, and you can determine the intensities by using heart rate monitors, power meters, or even your own rate of perceived exertion. Training zones simply ensure that you’re not working too hard, or too easy, at certain times such as the rest between intervals.
Just like ‘Training Methods’, training zones are personalised to yourself. They are based on your own level of fitness. For instance what may be a zone 2 recovery session for one athlete will probably not be a recovery session for someone else.
HOW MANY TRAINING ZONES ARE THERE?
This depends on who you ask. But for the sake of this blog post I will only be discussing the six-zone model, simply because it’s the one I tend to use, and it’s the model that I believe allows for more specificity in targeting certain adaptions in your training.
The below table shows each zone and relevant percentage based off your 'Threshold Heart Rate’ (if you use a heart rate monitor), or your ‘Threshold Power’ (if you use a power meter). I’ve also added on the ‘Rate of Perceived Exertion’ scale, and the typical duration that the average athlete would be able to spend in each training zone. Although this is highly subjective and dependant on training history.
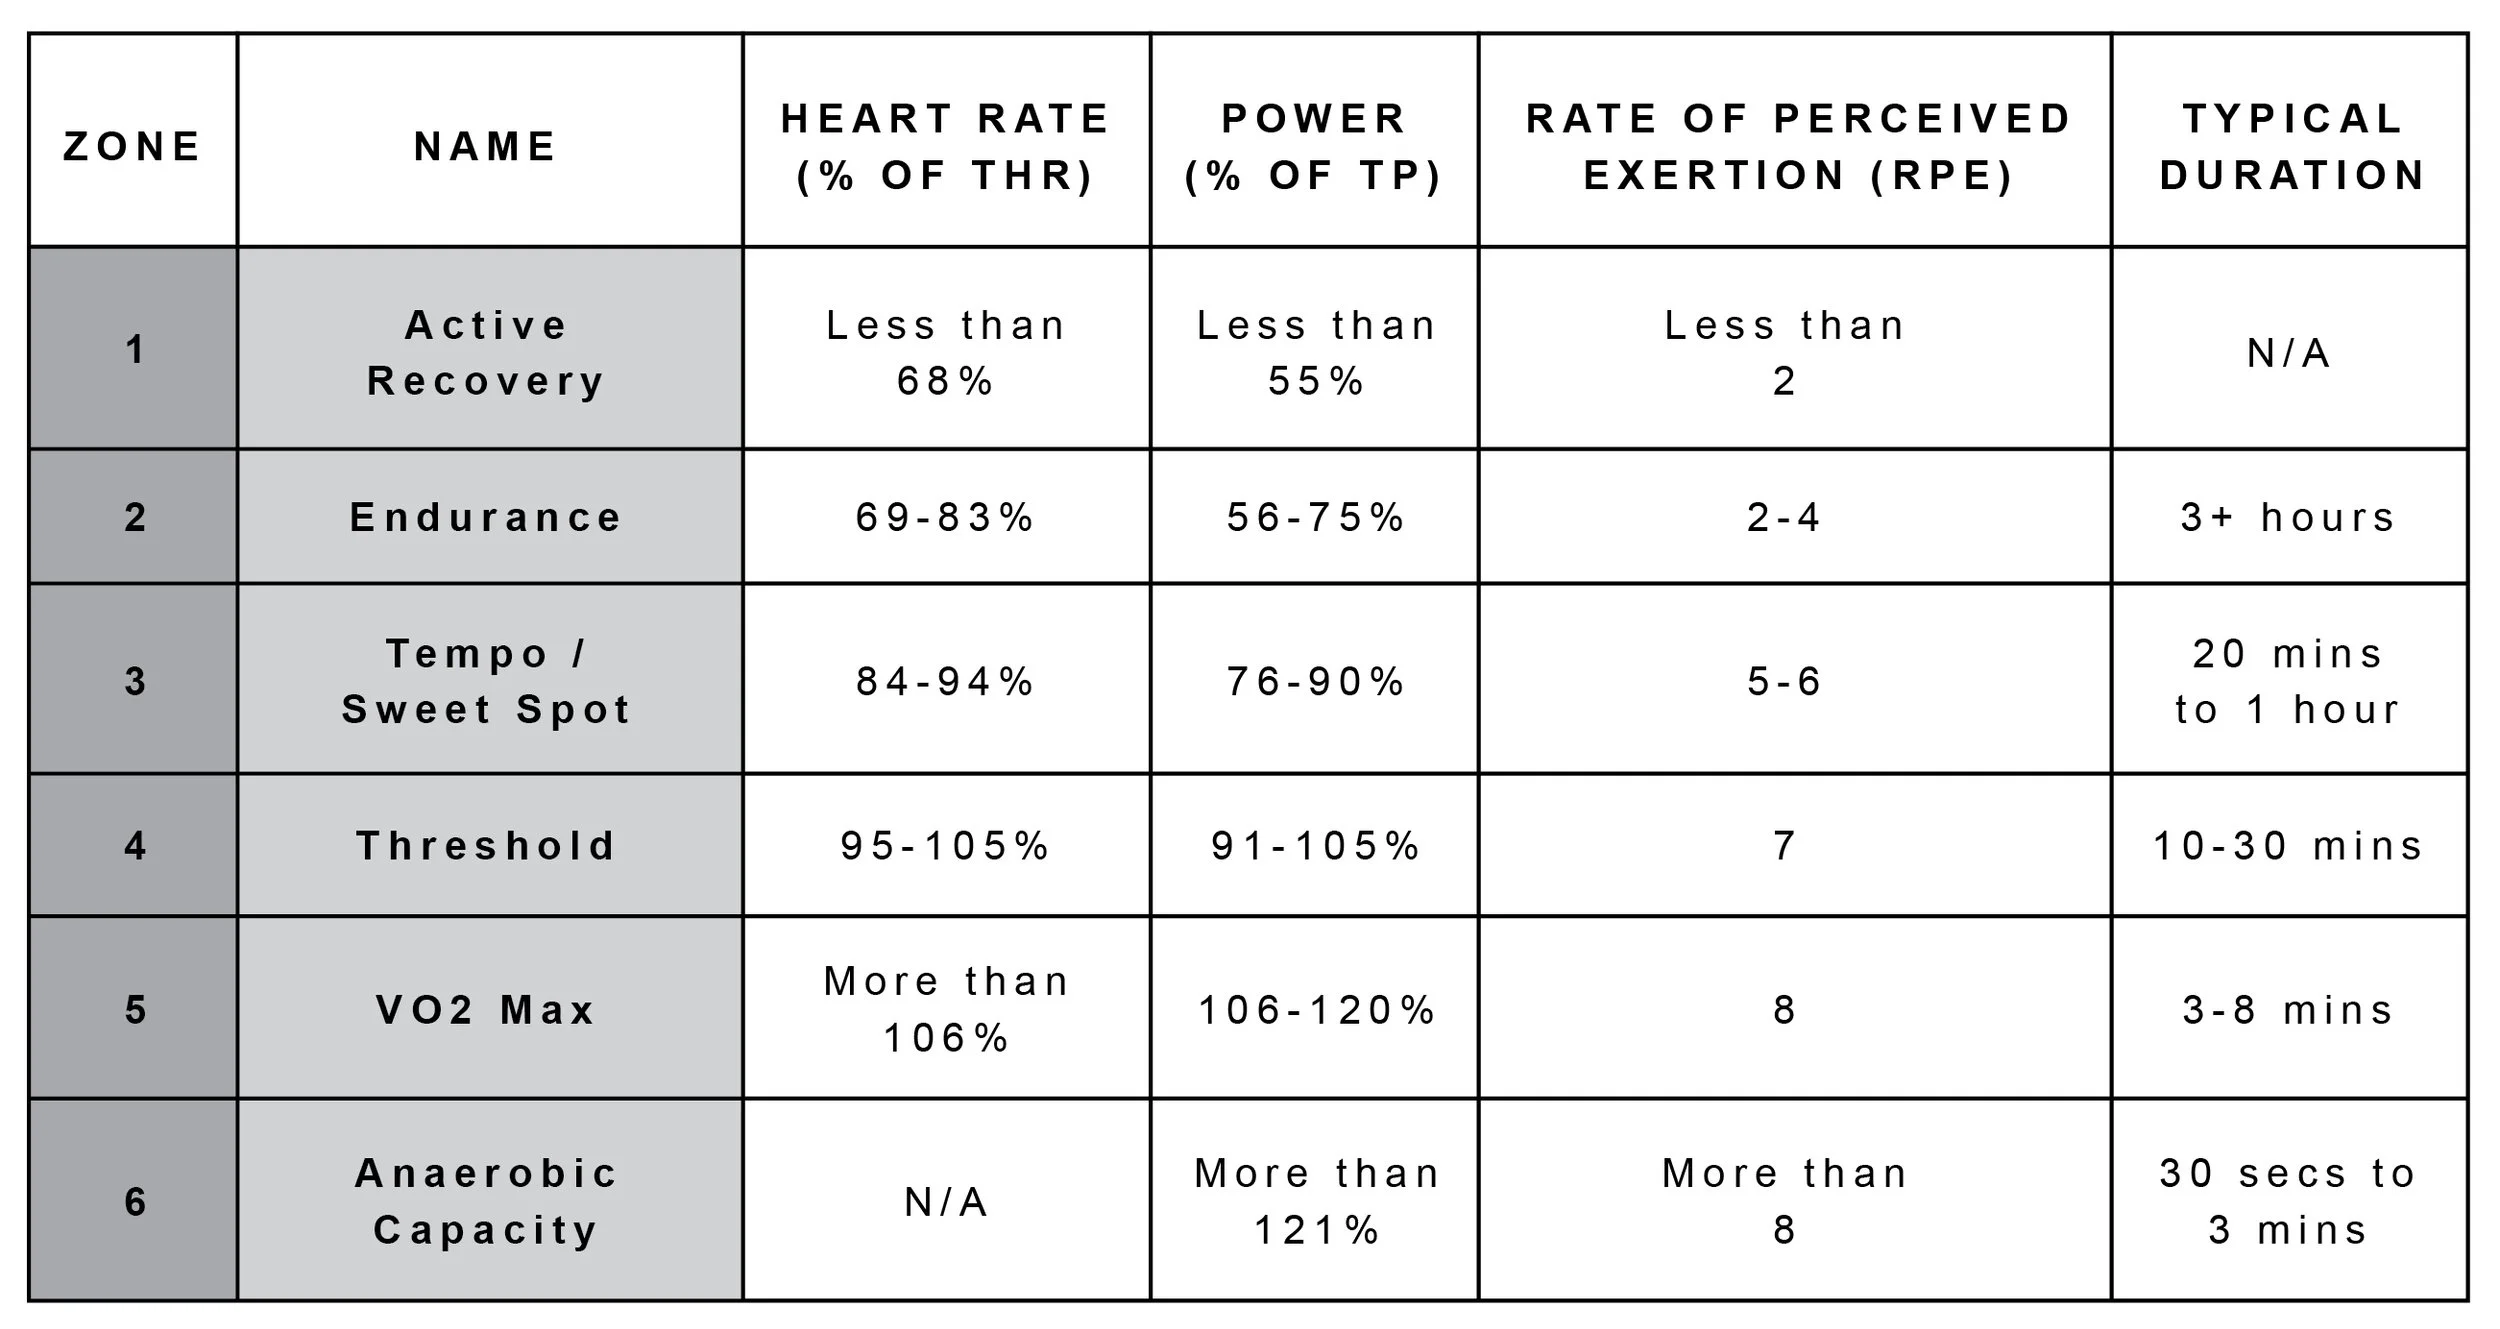
The RPE Scale. Note that in Zone 6 your heart rate monitor won’t react quick enough to match the effort, you should be going as hard as possible.
WHAT IF YOU DON’T HAVE ACCESS TO A HEART RATE MONITOR OR POWER METER?
You don’t need all the latest technology and gadgets to structure your training. Whether you use a heart rate monitor or power meter, gaining some experience and understanding of your own Rate of Perceived Exertion (RPE) can be an invaluable tool. It’s also the simplest and cheapest measure of intensity.
The RPE scale runs from 0-10 with 0 being no exertion at all, through to 10 being a maximum effort. The numbers effectively relate to phrases that you would use to describe how difficult you are finding an activity.
The only real downside of using the RPE scale is that you as an athlete are assessing yourself. It’s subjective, and can be difficult to put a number on how hard you are working. It will take a bit of time to practice, but you can practice just about every day, and if you suffer the unfortunate case of your heart rate monitor or power meter failing mid training, or worse case scenario during a race, you can continue by using RPE.
Below I’ve described how each zone should feel so you can use it as a guide to gauge your own RPE.
ZONE 1 - Active Recovery (Less than 2 out of 10 on the RPE Scale)
This zone should feel really easy. If you are a cyclist you should feel very little pressure through the pedals. As a runner you may find this is simply walking pace. Your breathing should be light and you should be able to hold a conversation quite easily. I would recommend typically using this zone after a super hard training session or race, as it aids recovery well.
ZONE 2 - Endurance (2-4 out of 10)
In this zone you should still be able to hold a conversation but your breathing will be a little heavier. With adequate fuelling many well trained athletes can hold this intensity for significantly longer than 3 hours.
ZONE 3 - Tempo / Sweet Spot (5-6 out of 10)
Your breathing will be harder and holding a conversation, whilst still possible, will feel uncomfortable. This zone requires much more focus and concentration to maintain the intensity effort. You will be able to train on consecutive days in this zone, but fuelling for the effort will be important. How long an athlete can work in this zone for depends on the intensity and how well trained the athlete is.
Zone 4 - Threshold (7 out of 10)
Holding a conversation will now be very difficult as your breathing will be heavy. You should feel a burning sensation in your muscles. Mental toughness will be developed in this zone, and because of the intensity level your workouts will generally be broken down into blocks or intervals. It can be very difficult to train consecutive days in this zone, but it is possible depending upon adequate fuelling and the recovery level of the athlete.
ZONE 5 - VO2 Max (8 out of 10)
It will likely be painful to ride or run in this zone for more than a few minutes. Your breathing will be very heavy and the intensity levels should be difficult to maintain. Get used to suffering in this zone. I wouldn’t recommend trying to complete consecutive days of training at the intensities required in this zone. You may find that it’s difficult to get your heart rate in the right place during the efforts required, so try to focus on the sensations you are feeling i.e your RPE.
ZONE 6 - Anaerobic Capacity (more than 8 out of 10)
The easiest way to describe this zone is that it should be extremely painful and very close to a max effort sprint. Most athletes will only be able to sustain the effort required for 30 secs to a minute. Using heart rate as a data metric in this situation can be problematic because of the lag in response from the monitor. Basically, this zone is max out effort and it should hurt. A lot.
HOW DO YOU TEST AND SET YOUR TRAINING ZONES?
There are a few recognised ways of testing your fitness which then allows you to set your training zones. Most of us can’t afford, or have the luxury of testing in a lab, but with modern technology it’s now become much easier to test and calculate your training zones by using a heart rate monitor, or a power meter. If you use a power meter you primarily have two options; an on bike power meter such as a pedal power meter or a crank based power meter, or alternatively you could use a power meter built into a smart trainer.
Heart Rate vs Power
There are pro’s and con’s for using either heart rate data or power meter data to test and establish your training zones.
An easy and generally affordable route into training with data is by using a heart rate monitor. But the data can often be disrupted by external factors such as sleep, altitude, fatigue, and caffeine intake. They are also known to suffer from lag. There will be times when the heart rate indicated isn’t indicative of the effort you are putting in. Plus the on wrist heart rate monitors i.e Apples iWatch and FitBit, are not reliable enough to use. If you go down the route of heart rate monitors I would recommend using a watch that allows you to link up a heart rate belt as they provide more accurate data, and are more reliable with their readings.
Power meters are the more expensive option, but the data is an instant reflection of the effort you are putting in. The downside of power meters, aside from the cost, is analysing the amount of data that they can provide. It’s mind-boggling.
In an ideal world, and it depends on your chosen sport, using both a heart rate monitor and a power meter together provide the ultimate set-up, but there’s no reason why you can’t chose one over the other. Just bear in mind the limitations of each, and always pay attention to your RPE just in case your heart rate monitor or power meter fails.
The type of test you chose to use depends on how you are recording the data i.e heart rate or power. Let’s start with power.
FTP TESTING AND RAMP TESTS
As a cyclist performing an FTP (Functional Threshold Power) test is the classic way to set your training zones. It’s the one you’ve probably heard of.
The FTP test simply provides an estimate of the maximum power output you can sustain for an hour. But don’t worry you don’t have to go all out for an hour, an FTP test is just 20 minutes long. Pacing a 20 minute effort is tough both mentally and physically. Once you’re finished you take your average power and multiply it by 0.95. This will be your FTP and from there you can calculate your training zones using the table above. Ideally you want to perform an FTP test on an indoor trainer/smart trainer. The reason for this is it’s easier to replicate the test in a controlled environment. If you test outdoors, there will be external factors at play such as the weather and traffic. You can’t control these external factors so your results may be compromised accordingly.
“The key with all testing is being able to repeat it with consistency from one test to the next”
There are a number of bike computers, especially Garmin’s, that will have built in FTP tests to follow. But if you have access to a Smart Trainer and sign up to a training app such as Zwift or TrainerRoad, you will likely have the option of either performing an FTP test or a Ramp Test.
A Ramp Test involves performing intervals, usually a minute long, at increasing levels of power output until you hit failure. It’s all controlled by your smart trainer so all you have to do is focus on pedalling and you let the smart trainer do the rest. A Ramp Test is still difficult, but it’s usually only the final few minutes where you will be suffering. Personally, when I test on the bike, I prefer to use the Ramp Test format as I find it easier to cope with, both mentally and physically.
If you don’t have access to a power meter you will likely be relying on a Heart Rate Monitor. Similar to an FTP test, you can also use your threshold heart rate to calculate your training zones.
THRESHOLD HEART RATE (THR)
To estimate your Threshold Heart Rate, which as a runner is what you will need to do, you want to be going all out for 30 minutes. Think of it as a time trail, and expect to suffer. It should hurt. 10 minutes into the effort, press the lap button and then push hard through the remaining 20 minutes. Once you have finished press the lap button again on your heart rate monitor and look to see what your average heart rate was for the final 20 minute push. The average heart rate shown is an estimate of your THR, so from there you can again use the table above to figure out your training zones. Going hard for 30 mins is difficult, what will tend to happen is that you will go off too quickly over the first few minutes and then pay for it towards the end, which will then give you slightly inaccurate results. If you use this method think of it as a race, start off relatively hard but aim to keep increasing the pace throughout.
Regardless of which test you use, the key is always pacing. The more testing you do the better you will become at the tests, especially as you will learn how to pace them from the start, which in turn will always represent more accurate data for analysis.
WHAT ARE THE BENEFITS OF TRAINING ZONES?
Each training zone sends a unique signal to the body, and it’s this signal that drives adaptation to the stresses of training. This is what improves performance. So whether you are new to structured training, or a professional athlete, there are a number of benefits to utilising training zones. Such as…
You will find it easier to manage your training workload to avoid overtraining
You have more data to track your progress over a greater period of time
You can target specific areas of your fitness to improve performance
You can ensure any recovery sessions are easy enough to allow your body to rest and adapt.
CONCLUSION
It’s important to understand that different sports, events and disciplines require different types of fitness. For example, an olympic triathlete won’t need to spend much time in zone 6 working on their anaerobic capacity, where as a sprinter or a criterium road cyclist will spend a significant amount of time training in that zone. Understanding training zones and how they apply to your chosen sport really is the key to unlocking that extra performance you may be craving.
By balancing time spent in each relevant zone, you can target your weaknesses with specific sessions, and make your training as effective as possible whilst minimising the effects of fatigue.
It’s a win-win.